Double opt-in is a process that serves to verify the consent of new contacts who subscribe to a list to receive communications via email, whether informative or commercial. So here we are going to explain how to create it using Pardot.
Keep reading for all the details!
What is it for?
On many occasions, we register ourselves on certain pages and after time we don’t even remember it. The result of this is hundreds of disconnected prospects that divert us to spam. On the other hand, double opt-in guarantees that potential clients give their explicit consent by having to go through a “double approval”.
How does this mechanism work?
Due to changes in how cookies work with Pardot, it is necessary to update the double opt-in process from a single click on a link to a form handler + click on a link. After the update, the configuration will be as follows:
- Initially, the user will fill out a form to subscribe to communications.
- You will then receive an email to confirm your subscription, which has a link.
- On the other hand, there will be a confirmation form controller that will record the confirmation of potential customers and update the subscription status.
- This will have a “Double opt-in” field that will become “true” when the previous step is completed.
- When the user clicks on the confirmation, they will be directed to a thank you landing page.
- From these steps, dynamic lists will be created that will separate the “Confirmed” from the “Not confirmed”.
What steps should I follow?
Step 1 | Create “Double opt-in” fields
It is necessary to create a custom field called “Double op-in”, with its corresponding checkbox, although it is not necessary to assign this field to Salesforce.
.png)
Step 2 | Create a Pardot Registration Form
When creating the form, we must keep in mind that the simpler it is, the better. You have to be explicit about what the prospect is agreeing to by subscribing, linking the privacy policy and their intentions at all times.
When adding a checkbox to provide consent, this can be done by creating a custom checkbox field. There are two ways to publish this form, either on a Pardot landing page or embedded on the website as an iframe.
.png)
Finally, you would have to add a completion action by clicking on ‘send automatic response email’.
Step 3 | Create the confirmation landing page
After the user clicks the button to confirm their subscription, they are directed to another page. It can be a home page with a thank you or a redirection to the website with a pop-up banner. The choice of either option is irrelevant, but it must always be accompanied by a confirmation message.
Step 4 | Create Custom redirects
After this, we need to create a custom redirect adding the URL of the destination page to which we want it to link in order to create a Completion Actions where we will select Set prospect custom field > Double Opt-In > True.
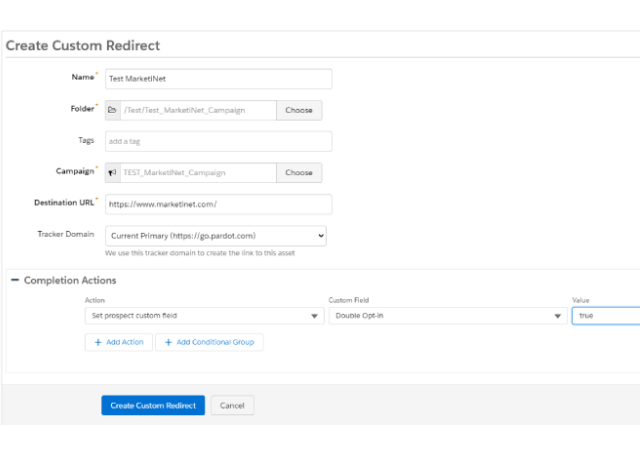
Thus, every time the user visits the page, the double opt-in status will be validated.
In this way we will guarantee the user’s second approval when they click on the confirmation email.
Step 5 | Create the email template
When creating the email template we must not forget to hyperlink the confirmation landing link.
After doing this process, we need to optimize how initial subscriber leads can be converted into leads whom we cand send emails.
{{cta(‘d066bfa4-948e-47d5-b61a-1f2ab4f66672′,’justifycenter’)}}
How to optimize the process?
Tip 1 | Create the double opt-in with Engagement Studio
It is possible to create double opt-in without Engagement Studio, but the process would end up disappearing in Pardot. On the other hand, if we introduce Engagement Studio into the process we can visualize and have a conversion percentage from one step to another.
Tip 2 | Increase the frequency
By leaving too much time between the first and second email we can lose momentum, since a delay of just 48 hours can cause a prospect to forget that they have registered. Therefore, it is very important to change the waiting times between different emails.
Tip 3 | Use date fields
Double opt-in date fields are required to comply with consent rules. In addition, they serve as a mark to know when consent was granted. By turning this process into an automation, we can monitor how long prospects have been pending double opt-in.
Tip 4 | Change the channel
Not all double opt-in flows will have the human touch, however, for prospects interested in a high-value service, it’s worth it. And, later on, a potential customer recycling/remarketing campaign could fail because confirmed consent was never given.
At MarketiNet we help you develop your Pardot campaign
We hope that you are now clearer about the possibilities and advantages of creating a double opt-in with Pardot.
And remember, at MarketiNet we are specialists in building automated marketing campaigns, so do not hesitate to contact us if you need to launch one for your company.
If you liked this article, you might also be interested in: